
Joining glass pieces together requires soldering. Since solder only adheres to metals and doesn't stick to glass, a metal must be placed along the glass edges of the joints. There are two joining techniques that use differently tooled metals for joining the glass pieces together: Lead Came or Copper Foil. The method you select depends on your glass assembly experience, the artistic look you want and the weather exposure of the window. Since copper foil is thinner than lead came it produces thinner more delicate lines than lead came does. Lead came is stronger and more weather resistant than copper foil and is the preferred method for exterior windows. This is important if the panels are exposed to the elements. So far, there are no known sundials made using the copper foil technique.
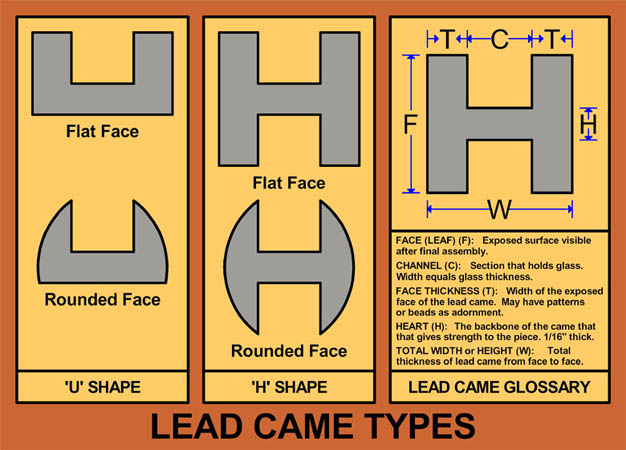
Lead Came: The old traditional lead came method uses extruded or milled lead strips that are channeled into an 'H' shape into which are inserted two adjoining glass pieces. The pieces are soldered at the joints and cemented in place. The lead came holds the pieces together and after cementing gives structural strength to the window. It comes in rolls or strips of different widths.
 |
If using the lead came glass joining method, the pattern designer must know the width of the lead strips that holds glass pieces together (the "came") to incorporate it into the design drawing. It comes in many forms but the most popular are the 'H' and the 'U' cross sectional shapes. Use the 'U' shape for a piece of glass that's not attached to another piece of glass, as in the border of the perimeter panels. And use the 'H' shape for joining two pieces of glass together. The came face is the visible part of the came and may be flat or rounded. Came is available in the US in face widths from 1/8" (318mm) to 1" (254mm). The most common face widths are 1/4" (6.35mm) round or 3/8" (4.69mm) flat. Pick a face width that is artistically pleasing for your design. You can use several different widths in the same design if you want. The center part of the came is called the "heart". Lead cames of all widths have hearts that are 1/16" (1.6 mm) thick. The two pieces of glass butt up against the heart of the lead came, which means that two adjoining panes are always separated by a distance of 1/16". |
Copper Foil: You can use copper foil in a stained glass sundial window if you put a protective pane of clear glass outside of the stained glass. The newer copper foil method made popular by L. C. Tiffany in the early 1900's involves wrapping the glass edge with a thin sheet of copper foil and then soldering the adjoining pieces together along the seams. It comes in thickness gauges of 1 mil, 1-1/4 mil, or 1-1/2 and in many widths. Choose a width that is artistically pleasing to your design. Copper foil does not withstand the weather as well as lead came. It is the best technique for windows that aren't exposed to the weather and that have many small glass pieces. Copper foil comes in rolls and has one adhesive side which you stick to the edge of the glass. The adhesive side comes in copper, silver or black colors. Match the backing color with the color of the solder: Use silver backing on clear glass that will have silver solder without a patina, and use black backing on clear glasses that will have black patina on the solder. You can use any color backing on opaque opalescent glasses since you can't see through them, but you might as well use copper backing on opaque glass since it is the least expensive.
The paper glass cutting pattern for copper foil should have 1/32" thick lines since copper foil is much thinner than 1/16" thick heart of metal came. After cutting the glass pieces and wrapping with foil, they should touch each other, with no space in between.
Accuracy of glass cutting is important with foil. You should grind the edges of the glass to produce a smooth edge so the adhesive side of the foil will adhere properly. Wrap the foil around the edge of the glass being careful that the foil is centered on the edge, otherwise the excess foil on one side of the glass will be very visible after soldering if using clear glass. Where the foil meets, overlap it about 1/4" so that it stays stuck to the glass and provides added strength. With the foil on the edge, fold it onto the sides of the glass. Rub a fid or a blunt piece of wood on the foil to make it stick firmly to the glass. To smooth out uneven pieces, put your finger on the foil and push firmly to the edge of the foil. Lay the pieces on your pattern, secure with pins and begin soldering. When finished soldering, add patina chemical if required.

|